Are you struggling to extend your WiFi network because your extender lacks a WPS button? You’re not alone. In this detailed guide, we will walk you through alternative steps to seamlessly you will get answer to How do I connect my WiFi extender without a WPS button ,ensuring your DLink camera setup—or any other device—stays smoothly connected without the need for one-touch WPS configurations.
Understanding the WiFi Extender
Before diving into the connection process, it’s essential to understand what a WiFi extender is and how it works. A WiFi extender, also known as a range extender, is designed to amplify your existing WiFi signal and broadcast it to areas of your home or office where the signal is weak or nonexistent.
Step 1: Position Your WiFi Extender
To begin, find an optimal location for your extender. It should be placed halfway between your router and the dead zone, ensuring it receives a strong signal from the router that it can re-broadcast effectively.
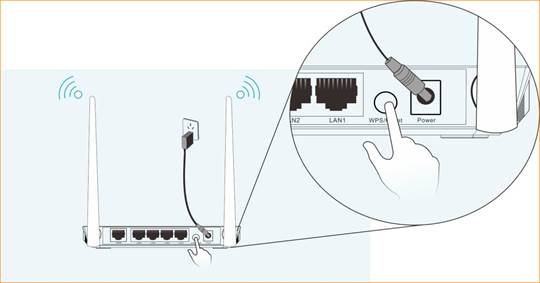
Step 2: Power On the WiFi Extender
Connect your WiFi extender to a power outlet and wait for it to boot up. Typically, there will be LED lights that indicate when the device is powered on and ready to be configured.
Step 3: Connect to the Extender’s Network
On a computer or mobile device, scan for available WiFi networks and connect to the network broadcasted by your extender. This is usually indicated by the extender’s model number or a default network name found in the device’s manual.
Step 4: Access the Extender’s Web Interface
Open a web browser and enter the IP address provided in the extender’s manual. This will take you to the extender’s login page. Enter the default username and password, also found in the manual, to access the settings dashboard.
Step 5: Setup the Connection Manually
Navigate to the setup or wireless settings section of the dashboard. You will need to manually enter the details of your home WiFi network. This typically includes the network’s SSID (name), security type (WPA2, WPA3, etc.), and the password.
Step 6: Save and Reboot
After entering the correct information, save these settings. The extender will likely reboot to apply the new configuration. Be patient, as this may take a couple of minutes.
Step 7: Connect the DLink Camera
Once your WiFi extender has been configured and is broadcasting the extended network, it’s time to connect devices like the
. Access the camera’s WiFi settings and connect it to the extender’s new network using the SSID and password you’ve just set up.
Step 8: Test the Connection
Finally, it’s crucial to test the connection. Move your DLink camera to its desired location and check the signal strength. If all steps were followed accurately, your camera should maintain a stable connection to your network through the extender.
Troubleshooting Tips
- LED Signal Indicators: Use LED indicators on the extender to help you find the best location with a good signal.
- Firmware Updates: Ensure that your extender’s firmware is updated to the latest version for improved stability and performance.
- SSID Naming: Consider giving your extended network the same SSID and password as your original network for seamless roaming.
Conclusion
Connecting a WiFi extender without a WPS button is straightforward with the right guidance. By meticulously following the steps above, you can ensure that your WiFi network’s reach is extended, and devices like your DLink camera remain connected, offering you peace of mind and greater network flexibility.
Implementing these measures will bypass the need for a WPS button while still securing a robust and extended WiFi connection. Remember to consult your extender’s manual for specific instructions related to the model, and reach out to customer support should you encounter unique issues during setup.
Expanding your WiFi network’s reach without a WPS button is not only doable; it’s a chance to familiarize yourself with the inner workings of your network—and that’s empowering for any tech user.
—
Note: This content has been crafted to address the issues faced when connecting a WiFi extender without a WPS button to ensure the stable operation of devices, such as DLink cameras. It is structured around commonly asked questions and provides systematic guidance to non-tech-savvy individuals or those less familiar with networking equipment.