A built-in wardrobe is not just a functional storage solution but also a stylish addition to any home. It offers a seamless and space-efficient way to organize your clothes, shoes, accessories, and more. However, designing a built-in wardrobe requires careful planning and consideration of various factors. In this comprehensive guide, we will take you through a step-by-step process of designing a functional, aesthetically pleasing, and personalized built-in wardrobe that perfectly suits your needs and enhances your living space.
Step 1: Assess Your Needs
The first step in designing a built-in wardrobe is to assess your storage needs thoroughly. Take inventory of your clothing, shoes, accessories, and any other items you plan to store in the wardrobe. Consider the different types of clothing you own, such as dresses, suits, shirts, and trousers. Determine if you need more hanging space or shelving for folded items. Assess whether you need specific storage solutions for shoes, bags, ties, belts, or jewelry.
Ask yourself the following questions:
- How much hanging space do you need for longer garments like dresses and coats?
- How many shelves do you need for folded items like sweaters, t-shirts, and jeans?
- Do you require drawers for organizing smaller items?
- Do you have a significant shoe collection that requires specific storage?
By understanding your storage requirements, you can plan the internal layout of the wardrobe more effectively.
Step 2: Measure the Space
Accurate measurements are crucial when designing a built-in wardrobe. Measure the dimensions of the area where you want the wardrobe to be installed. Take note of the height, width, and depth available. Consider any irregularities in the space, such as alcoves, sloped ceilings, or protruding elements. These measurements will be the foundation of your wardrobe design, ensuring that it fits perfectly into the designated space.
Step 3: Decide on the Layout
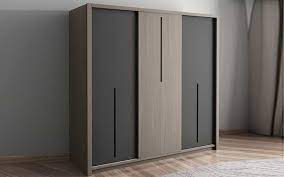
Once you have your measurements, it’s time to decide on the layout of your built-in wardrobe. The layout should align with your storage needs and the available space. Common configurations include single-door wardrobes, two-door wardrobes, or sliding doors. Additionally, you can choose to have different sections for different types of clothing or accessories.
Consider the following layout options:
- Single-section: A single-door wardrobe with one large section for hanging clothes and shelves or drawers below.
- Two-section: A two-door wardrobe with one section for hanging clothes and the other section for shelves or drawers.
- Multi-section: A larger wardrobe with multiple doors, offering dedicated sections for different types of clothing or storage needs.
Ensure that the layout allows for easy access to all parts of the wardrobe and that it maximizes the available space efficiently.
Step 4: Internal Fittings
The internal fittings of the built-in wardrobe play a crucial role in organizing your belongings effectively. Consider including the following internal fittings based on your storage needs:
Hanging Rails: These are essential for hanging clothes like dresses, shirts, and coats. Consider having a double-height rail section for shorter clothes like shirts and jackets.
Shelves: Shelves are perfect for storing folded items like sweaters, jeans, and t-shirts. Adjustable shelves allow you to customize the space according to your needs.
Drawers: Incorporating drawers provides a neat and organized way to store smaller items like socks, underwear, and accessories.
Shoe Racks: A shoe rack or shoe shelves are a must if you have a considerable shoe collection. These keep your shoes organized and easily accessible.
Accessories Storage: Consider including dedicated storage for accessories like ties, belts, scarves, and jewelry. This can be in the form of pull-out trays, hooks, or small drawers.
Full-Length Mirror: If space permits, integrating a full-length mirror into the wardrobe door can be a practical and space-saving addition.
The combination and arrangement of these internal fittings depend on your specific storage needs and preferences. Customize the wardrobe to suit your lifestyle and the items you plan to store.
Step 5: Material Selection
Selecting the right materials for your built-in wardrobe is essential to achieve the desired aesthetics and durability. Common materials include:
Wood: Natural wood is a classic and timeless choice that adds warmth and elegance to any room. It comes in various finishes and can be stained or painted to match your room’s decor.
MDF (Medium-Density Fiberboard): MDF is a cost-effective option that provides a smooth surface for painting. It is stable, resistant to warping, and offers a consistent finish.
Laminates: Laminates are available in a wide range of colors, patterns, and textures. They are durable, easy to clean, and can mimic the appearance of wood or other materials.
Glass: Incorporating glass doors or panels can add a touch of modernity and lightness to the wardrobe design.
When choosing the material, consider factors like budget, style preferences, and the overall aesthetic of your room.
Step 6: Seek Professional Help if Needed
If you’re unsure about the technical aspects of designing the wardrobe, consider seeking help from a professional carpenter, interior designer, or specialized wardrobe manufacturer. They can provide valuable insights and ensure that your design is structurally sound. Their expertise can help you overcome design challenges and create a customized wardrobe that perfectly fits your needs and space.
A professional can also help you optimize the storage solutions and suggest innovative ideas that you might not have considered.
Step 7: Sketch or Use Design Software
Before proceeding with the construction, create a detailed sketch or use design software to visualize the final product. This will help you see how the wardrobe will fit into your space and make any necessary adjustments before construction begins. A visual representation will also aid in conveying your ideas to professionals involved in the project.
Step 8: Budget Considerations
As with any home improvement project, it’s essential to establish a budget for your built-in wardrobe design. Determine how much you are willing to spend and try to stay within that limit. Keep in mind that built-in wardrobes can vary in price based on materials, size, and complexity. Balancing quality and cost-effectiveness is key to achieving a successful wardrobe design.
Discuss the budget with your chosen professionals to ensure that they can work within the allocated amount without compromising on the quality of materials or workmanship.
Step 9: Safety and Structural Considerations
Safety should always be a priority when designing and building a built-in wardrobe. Ensure that the wardrobe is designed with proper structural support and is securely fixed to the walls or floor to avoid any accidents or toppling hazards. If you’re incorporating heavy materials or oversized elements, consult a professional to ensure structural integrity.
Additionally, consider using childproof mechanisms to prevent accidents and injuries, especially if you have young children at home.
Step 10: Construction and Installation
Once the design is finalized, it’s time to move on to the construction and installation phase. If you’re working with a professional, they will take care of this process. However, if you’re a DIY enthusiast, follow these steps:
1. Gather Materials and Tools: Purchase all the required materials, including wood or MDF boards, hinges, handles, screws, and other hardware. Ensure that you have the necessary tools such as a drill, saw, screwdriver, measuring tape, and level.
2. Prepare the Space: Clear the area where the wardrobe will be installed. If there are any obstacles or protruding elements, make necessary adjustments to the wardrobe design.
3. Construct the Framework: Start by constructing the framework of the wardrobe. Use appropriate techniques and materials to ensure the structure is sturdy and stable.
4. Install Internal Fittings: Assemble and install the internal fittings, including hanging rails, shelves, drawers, and other accessories. Double-check the measurements and alignment to ensure everything fits perfectly.
5. Add Finishing Touches: Sand the surfaces to achieve a smooth finish. Apply the desired paint or varnish to match the rest of your room’s decor.
6. Install Doors: If you’ve chosen doors for your wardrobe, install them carefully, ensuring they open and close smoothly.
7. Test and Adjust: Once the construction is complete, thoroughly test the functionality of the wardrobe. Make any necessary adjustments to achieve the desired results.
Conclusion
Designing a built-in wardrobe is an exciting project that allows you to create a customized storage solution tailored to your needs and preferences. By carefully assessing your storage needs, measuring the space, selecting appropriate materials, and seeking professional help when needed, you can create a functional and aesthetically pleasing built-in wardrobe that enhances your living space and keeps your belongings organized.
Remember to prioritize safety and quality throughout the process to ensure that your built-in wardrobe serves you well for years to come. Whether you’re working with a professional or taking on the project yourself, the effort and thought put into the design will be well worth it when you see the final result: a beautiful and practical built-in wardrobe that elevates your home’s functionality and style.